Pages

Saturday, September 29, 2012

No Plans

This is the first weekend in several months that I've had no formal plans and no running around to do. The last few months have felt jam packed with showers, parties and other fun events, but I'd be lying if I said I wasn't looking forward to having a relaxing weekend at home, finally!

Last night we started the weekend off with homemade Chinese food and a movie. I really didn't feel like cooking, but didn't want to give into take-out tempatation, so got to work in the kitchen on a stir-fry - it was one of the few things on my dinners list that sounded appealing on a Friday night after a long week of work.


In a half hour we had a fresh stir-fry of tofu (cooked the usual way), veggies and rice noodles.


I also got a chance to use my julienne gadget for the first time - my mom gave it to me for a bridal shower gift over 4 years ago, and believe it or not I never remember to use it. Last night I shredded the carrots with it and loved how thin and uniform the carrot shreds turned out! They cooked up super quick too.


We polished off our stir-frys with the last of our Beer Camp beers. I had the Imperial Pilsner, which was deliciously hoppy. After dinner we put Riker to bed and curled up on the couch to watch an impromptu movie selection, Limitless. I wasn't sure what to expect, but I actually thought it was quite good. It definitely kept me entertained and not falling asleep at 11:00 on a Friday night, which is hard to do these days. ;-)


***

We woke up this morning in no rush and with nowhere to be, and it felt amazing. After an oatmeal breakfast, we decided to head over to Island Heights, a local bay town that hosts an annual town-wide yard sale. Island Heights is an artsy neighborhood, so we usually find some unique stuff while we're there.


We stopped off at D&D for pumpkin spice coffees and then met up with our friends Chris and Vanessa to walk the town together. Chris found a whole ton of stuff for their new house, including an old-fashioned birthing chair - haha! I have to say, that thing is unbelievably comfortable. They must have known a thing or two about giving birth way back when.


I snagged a few cool items, including a handmade clay mug made by a local potter. I'm in the process of getting rid of all my old, crappy mugs and replacing them with new ones, so this one will happily take the place of a junky old green one I'm sick of looking at. Can't wait to have my coffee in this tomorrow!


It was a beautiful morning for walking around town sipping on coffee and checking out antique and handmade furniture and household goods. We were there longer than I anticipated, so thankfully I had packed some snacks for the road.


After leaving the yard sale, we stopped off for sandwiches and then met up with Matt's parents for a bike ride down the rail trail near their house.


Love this crisp fall weather! We completed a 7 mile loop before calling it a day.

We just got home and ate a quick dinner of whole wheat pasta with broccoli, leftover butternut squash, sundried tomatoes and Laughing Cow cheese wedges. We were starving and it was the quickest thing I could come up with, but it was pretty tasty.


Not sure what the evening has in store for us, but it looks like the perfect night for a backyard fire. We'll see!

Off to continue this lovely weekend with my little fam!

Butternut Squash & Blue Cheese Pasta Bake

I'm always looking for ways to lighten up mac & cheese, and using vegetable purees is a great way to add volume and a smooth texture without a bunch of butter and cream. I make cauliflower mac & cheese quite often in the winter, and love squash with pasta (pumpkin ravioli...yum), but for some reason never thought to combine squash with mac & cheese. Until I came across a butternut squash macaroni dish on Pinterest. Yes please!


I made a few changes to the original recipe to "healthify" it even more, but this pasta is so, so good. The squash gives the sauce a nice creamy texture without any use of cream, the blue cheese gives it a zing and ton of added flavor, and the sage adds a nice earthy undertone.


Since I work from home most days, I put the squash in the oven to bake around lunch time (350 degrees for around an hour, covered with foil). Then I let it cool on the countertop until dinnertime, at which point I just scraped the flesh from the skins and mashed it up until it was smooth. Once the squash is pureed, the rest of the dish comes together fairly quickly.


I had actually forgotten I'd grown a bunch of sage in my herb garden, so was excited to finally have a use for it. I forgot how much I love the stuff!


I served the pasta alongside green salads with a lemon vinaigrette, and it was a huge hit.


It'll definitely be in the rotation a few more times this fall.

Butternut Squash & Blue Cheese Pasta Bake

Serves 4
Lightly adapted from Butternut Squash Macaroni by Daily Unadventures in Cooking

Ingredients
1 Tbsp. olive oil
1/2 onion, minced
1 clove garlic, minced
1 Tbsp. fresh sage, chopped
1/2 tsp. crushed red pepper
1 Tbsp. flour
2 cups skim milk
2 cups butternut squash puree
1 tsp. salt
1 tsp. pepper
3 cups whole wheat pasta shells
3 medium tomatoes, chopped 
4 oz. crumbled blue cheese
1/4 cup panko breadcrumbs

Bring a pot of water to boil; add the pasta and cook about 8 minutes, until al dente (do not overcook). Set aside.

Preheat oven to 375 degrees.

In a saucepan, add the olive oil and a bit of cooking spray, and heat over medium-low heat. Add onions and sweat until translucent. Add the garlic, sage and crushed red pepper and continue cooking until garlic is softened. Add more cooking spray if needed.

Sprinkle the flour on top and whisk together. Stir over medium heat for 2 minutes. Add the milk half at a time, whisking until smooth. Add the squash puree and whisk to combine. Add salt and pepper, then bring to a low simmer; cook for a few minutes more, until sauce starts to thicken. Add the tomatoes and then the blue cheese, and continue cooking over low heat until cheese is mostly melted. Finally, add the pasta to the sauce.

Transfer the pasta mixture to a casserole dish sprayed with cooking spray, and bake for about 10 minutes. Broil for the last minute to brown the top, then serve immediately.

Tuesday, September 25, 2012

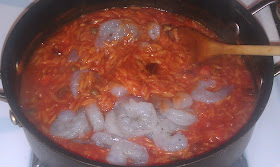
Savory Tomato Orzo with Shrimp & Greek Olives

Fall dinners are in full swing! These chilly evenings have me digging through my recipes and pulling out some old cold weather standbys. When I was making my meals list last weekend, I added an old favorite to the rotation - Braised Halibut from a Weight Watchers cookbook I was given a few years ago.


I love this dish because it's warm (and steamy as you can tell by the pic up there) and satisfying, but boasts some great nutrition facts. I didn't feel like using the flaky white fish this time, though, so changed it up by adding shrimp and a few other ingredients.


It also includes capers and kalamata olives, two of my favorite ingredients. They add a burst of saltiness and a surprise flavor element to the tomato-based dish. Next time I'd consider topping it with some crumbled feta cheese as well.


As much as I wanted to curl up on the couch with this bowl of hot pasta and shrimp, we sat at the table as a family and talked through dinner instead, which was of course much more enjoyable in the end. After putting Riker to bed I had pleeeenty of time to lounge in the living room and watch the ridiculousness of Monday Night Football unfold - I swear, I think football fans are going to blow a gasket soon if we don't get our pro refs back!

Have you guys seen this pic from last night's game, where one ref is calling a touchdown and the other is calling an incomplete pass? I kind of love it.


I digress. Make this dish - it's easy and comforting and beckons on the cold weather. Nutrition stats included below!

Tomato Orzo with Shrimp & Greek Olives

Serves 4
Adapted from Braised Halibut and Tomatoes with Orzo by Weight Watchers

Ingredients
2 tsp. olive oil
1 small onion, chopped
2 garlic cloves, minced
1 carrot, peeled and chopped
1/2 tsp. caraway seeds (optional)
1 16-oz. can crushed tomatoes
1 1/2 cups water
1 cup orzo
12 kalamata olives, chopped
2 Tbsp. capers
1 tsp. salt
1 tsp. pepper
1 tsp. crushed red pepper flakes
8 oz. shrimp, peeled and deveined

Heat oil in a skillet over medium heat. Add onions and carrots and saute 2-3 minutes. Add garlic and caraway seeds, and continue cooking a minute more, until all veggies are softened.

Stir in the tomatoes, water, orzo, olives, capers, 1/2 tsp. salt, 1/2 tsp. pepper, and crushed red pepper flakes. Bring to a boil, then cover, reduce heat and simmer for about 5 minutes. Stir often and add more water if mixture becomes too thick or sticky.

Season the shrimp with remaining salt and pepper, then add to the skillet and mix into the orzo/tomato mixture. Cover again and continue cooking about 8 minutes, until shrimp are pink and cooked through. Serve immediately.


Monday, September 24, 2012

Celebrating a Milestone

Yesterday our family celebrated a most amazing milestone...MomMom's 90th birthday!


MomMom is one of the sweetest people I've ever met and I feel so blessed to have inherited her as part of my family when I married Matt. She's always treated me as one of her own grandkids and I've grown to love her dearly.


Having lived for 90 years, she has so seen things in this world. She remembers getting her first telephone and having to dial a switchboard operator to make a call; she remembers stopping at the corner store on the way home from school to buy potato chips for 5 cents, which were scooped out of a huge sack and into a little paper bag for each kid; when she had her babies, men weren't allowed in the maternity ward (imagine!); she used to make homemade ketchup and chili sauce before they were bottled and sold in the store; she worked for one month during World War II, and has never once driven a car. I love listening to her stories about what life was like when she was growing up, and how things have changed.

In recognition of MomMom's 9 decades, Matt's whole family got together on Sunday for a day of celebration. Most of the family went to church with her in the morning - a wish of hers - but I met up with everyone at 12:30 for lunch at Bonefish Grill.


Bonefish makes a mean Bloody Mary for Sunday brunch, complete with fresh tomatoes and blue cheese-stuffed olives. I had to have one, but ended up only drinking half before relinquishing the rest of my drink to Matt.

We ordered a few appetizers for the table to share, and I had a little bit of everything - bread with basil pesto, bang bang shrimp and Ahi sesame tuna.


Matt and I split a side salad before our entrees came as well. It included pumpkin seeds and hearts of palm, which was a nice spin on the traditional house salad.


For lunch, I ordered the grilled Chilean sea bass, which is one of my favorite fishes. It came with an Asian sauce, garlic mashed potatoes and corn succotash. I only ate a few bites of potato and gave the rest to Matt and Riker, but they were delicious. I like that Bonefish offers half-orders of all dishes, especially for lunch! It makes portion control much easier.


After lunch we all headed back to Matt's parents' house to relax in the afternoon sunshine, play a little whiffle ball and look at the giant spiders weaving webs near the house. 


I'm not squeamish about bugs, but those spiders gave me the shivers, creeeepy!


By the time the late afternoon football games came on, we were of course all hungry again, so nibbled on small sandwiches and salads before the finale - Dairy Queen ice cream cake and presents.


We love you MomMom!

Sunday, September 23, 2012

City Night

Morning, friends! Hope you're having a great weekend so far. I'm in the midst of a double birthday weekend and it's been a good one so far.

Yesterday after a day filled with errands (including ordering my new iPhone 5, woot!), my best girlfriends and I headed up to New York to celebrate the last of our little group turning 30. My friend Abby recently got a new apartment in the city, so we were all excited to check it out and take her out for a night on the town.


We started the evening sipping on sweet tea & waters and watching a photo slideshow of all our times together over the last year. It was so fun reminiscing about all the big events and great times we've had during the last year of our 20s.

After a few hours at Abby's apartment, we jumped into cabs and headed to the East Village to meet up with some of Abby's coworkers and hang out at a few local spots. 


It's always a great time with these ladies!


This morning we woke up early, showered, and got on the road by 9:30 AM. I would've loved to stay and have brunch in the city, but all us girls had other things to attend today and needed to get home. So, breakfast on the go it was!


I grabbed a fruit and yogurt parfait and a cup of coffee at the rest area. Not a shabby on-the-go breakfast.

Now I'm off to Part Two of the birthday weekend - MomMom's 90th celebration!

Saturday, September 22, 2012

At-Home Date Night

After a long week of work, a cozy Friday night at home is usually my plan of choice. Last night was no different, but neither Matt nor I were in the mood for sitting on the couch, so when he walked in the door at 6:30 last night I cracked open a bottle of red wine, set out some freshly made sourdough bread and cheese, and put on my favorite John Mayer Pandora station. Date night at home!


Last weekend I found this espresso crusted parmesan cheese at the grocery store, and after sampling it I had to have it. It's super sharp and salty, and has a hint of coffee. It's too good to just eat on a whim, but is perfect for snacking on with a glass of wine.


I would've been perfectly fine with a wine & cheese dinner with a little bread and some condiments (one of my favorite meals), but Matt needed something a little more substantial, and sweetly requested some homemade pasta. Why not? Making pasta is really fun when you have company in the kitchen. While we chatted I made up a batch of black pepper fettucini to mix with some pesto I had made.


I actually made the pesto last weekend to use up some fresh basil I had. This was a basic Joy of Cooking pesto recipe, except I used about 1/3 less olive oil and subbed walnuts for pine nuts.


I didn't want to use it when I made it on Sunday, so covered it with a bit of olive oil and stored it in the fridge. Fresh pesto will last about a week this way.


Last night after I cooked the fresh pasta, I grabbed my pesto and reheated in the microwave for a minute before tossing it with the pasta.


Matt had the genius idea of grating a bit of the espresso parmesan to sprinkle over top, and that seriously set this meal over the edge. It had so much flavor, we were literally "mmm-ing" the entire way through our plates.


I know you're noticing the serious lack of vegetables in this meal. I know. I considered making a salad, but whatever, it's Friday night. I loved that everything we ate last night was homemade though, besides the cheese - the bread, pasta and pesto all came right from my kitchen. Love that!

We spent the rest of the evening sitting out back sipping on our wine and watching Butters chase the cat and have a serious fight with a cardboard box. Never get sick of watching that crazy dog act like a fool. ;-) Speaking of, have you seen this Oatmeal cartoon that's been floating around Facebook? I no joke laughed the entire time I read it, so funny!


Off to have some breakfast and get a start on the day. I have a million errands to run before heading up to the city for a girls' night out to celebrate another of our bunch turning the big 3-0. Have a great weekend!

Friday, September 21, 2012

Recipe ReDux: Herbed Sourdough Bread

Welcome to Some Sugar Added's first Recipe ReDux post! If you're not familiar with The Recipe ReDux, it's a recipe challenge founded by registered dietitians aimed at taking delicious dishes, keeping them delicious, but making them better for you. Right up my alley!

The theme of this month's Recipe ReDux is fermented foods. Fermented foods have many health benefits, and most of us eat them every day - yogurt, cheese, sauerkraut, kimchi, soy sauce, and yes, beer. :) I did actually think about writing a post on homebrewing, but alas, I can't really say that beer, although delicious and quite scientific to make, is that great for you. So instead I challenged myself with a new culinary adventure - making homemade sourdough bread.


While most breads use yeast for leavening, sourdough is the only (I think?) bread that actually requires the yeast to ferment, which gives it that unique sour flavor reminiscent of tangy yogurt. The process of making it is interesting and rustic - you start by making a starter, which is a combination of yeast, flour, sugar and warm water.


The starter must ferment for 8-12 hours, so I mixed it together last night and let it sit in the oven overnight.


The starter is actually alive at this point, and you can keep it living for as long as you want by "feeding" it; every time you take some out to use in a bread dough, you just add some more water and flour and stick it back in the fridge. You could literally have sourdough starter on hand for years, and the longer it sits, the more "sour" it becomes. I can't wait to see what kind of character this starter takes on down the road. This process reminds me of the thousand-year-old Asian kimchis I've heard about.


Making the starter is the longest process, so once you have one, you're good to go. If you have bread-loving friends, you could even gift them a jar of your starter since you'll likely have plenty leftover. Local friends, care for a jar of yeast? ;-)

Once the starter is ready, just mix it with flour, knead it for a few minutes and let it rise.


Then roll it into a ball and let it rise again. Mark it with an "X," add some olive oil or cooking spray, and sprinkle with herbs. I love the look of that shiny, glistening loaf.


Then bake it for an hour and let the smell of yeast fill your whole house. It's probably one of the best smells in the world.


You're supposed to wait 30 minutes before slicing it, but really, who does that? Not me. Warm bread is the best.ever.

Check out the other great Recipe ReDux fermented food posts below the recipe!

Herbed Sourdough Bread

Makes 1 loaf
Adapted from Basic Sourdough Bread by Emeril Lagasse 

Ingredients
2 cups flour
1 1/2 cups sourdough starter (below)
3/4 tsp. sea salt
1 tsp. dried thyme

Combine the flour, starter and salt and knead until the dough comes together. If using an electric mixer, use the dough hook and knead until the dough no longer sticks to the bowl.

Place the dough in a lightly oiled bowl (I use olive oil cooking spray), turning to coat. Cover with a kitchen towel and let dough rise in a warm place until doubled in size, about 1 1/2 hours. Turn out onto a floured surface and knead 2-3 times. Then knead into a small circle, shape into a small ball, and pinch the seams together underneath. Place on a floured board, seam-side down, cover with a towel and let rise until doubled in size again, about 1 hour.

Dust a baking stone with cornmeal and preheat it at 400 degrees (if you don't have a baking stone, just use a baking sheet). With a sharp knife, cut an "X" on the top of the dough. Spray lightly with olive oil and sprinkle thyme across the top.

Transfer dough to the baking sheet/stone and bake 45-60 minutes, or until the bread is golden brown and sounds hollow when thumped on the bottom. Remove from oven and let cool 30 minutes before slicing.

Sourdough Starter

Ingredients
3 cups warm water
1 1/2 Tbsp. active dry yeast
1 tsp. sugar
3 cups flour

Combine the water, yeast and sugar in a bowl. Let sit until the yeast becomes foamy, about 5 minutes.

Add the flour and whisk until combined. Cover with a towel and let rest in a warm place (such as inside an oven with the light on) for 8-12 hours. Starter should be bubbly when it is done.

To Feed and Preserve the Starter
Each time you remove a portion of the starter for a recipe, reserve at least 1/4 cup and replace the amount you have taken out with equal amounts flour and water. For example, if you remove 1 cup of starter, replace it with 1 cup of flour and 1 cup of warm water. Whisk them together, cover loosely and return to the refrigerator.

The starter must be fed every few days or the yeast will die. To feed the starter, remove 1 cup (use it or discard it), and add 1 cup of flour and 1 cup of warm water. Whisk until blended (not smooth) and return to the fridge again.

The starter will last in the fridge for about a week. Otherwise it can be stored in a sterilized, airtight container and frozen. Thaw the starter 2 days before you plan to use it. Refresh as indicated above, then cover and leave at room temperature overnight before using.

Caution: Do not keep your starter tightly closed. The yeast will expel gasses and build up pressure, and may cause the container or jar to burst. If using a Mason jar, leave the lid unscrewed and resting gently on top.